So I spent a lot of time in the past quarter working on the armatures for my test puppets for Posthaste. I wanted to try a few different materials and configurations to see if I could make some improvements on the basic wood and wire structure commonly used for basic puppet building.
My first step was to actually build a wood and wire skeleton to act as a control and to test out a few variations in terms of wire thickness for certain joints and for some of my ideas for possible foot and hand construction techniques.
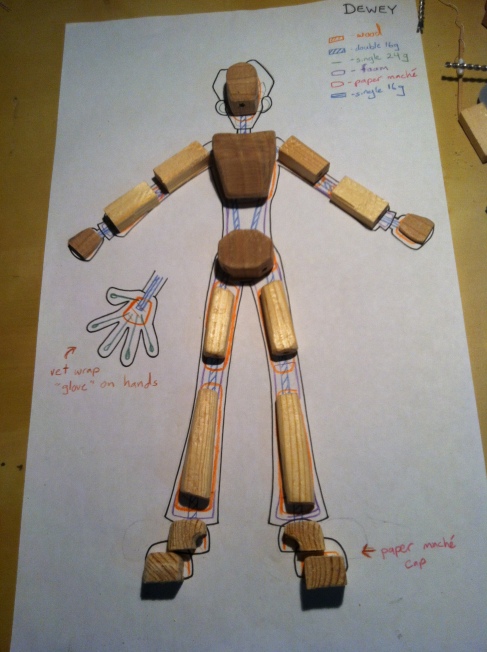
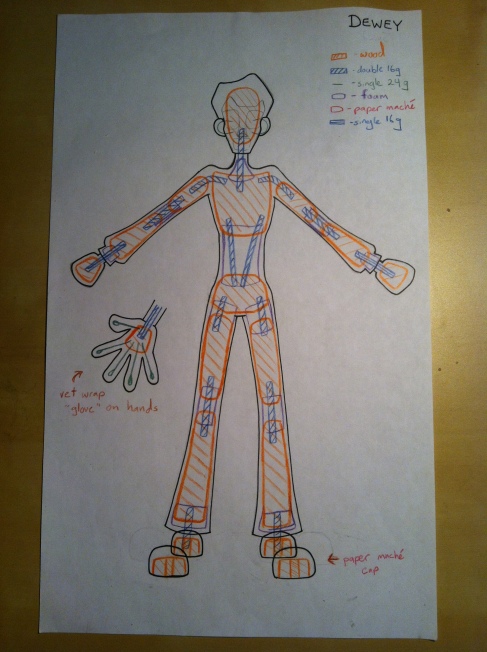
Here is the planning sketch I drew up for the first puppet, Dewey, based on the 11 inch height I planned for the final version of my main character, Randy.
The orange sections are made of shaped wood. In this case his torso, pelvis, and head is made out of some scraps of hardwood I had lying around. The arm, leg, and foot pieces are made from some pieces of pine I scavenged from a crate used to pack a large picture during our recent move to the pacific northwest.
Here are the pieces laid out over the puppet blueprint.
Now with a typical puppet, to get realistic movement you follow the basic human skeletal structure (assuming you’re making a humanoid character). In this case I decided to try an un-common double spine. At the end of the script the story calls for a woman to walk by with a very hippy walk cycle, and I wanted to test and see if having that extra spine segment will allow me to get more twist in the hips without bending the wire to such a degree that it wears out too quickly.
In the Introduction to Puppet Building class I took with Tom Gasek at RIT a few years back we built similar wood and wire puppet armatures using two lengths of 16 gauge aluminum wire twisted together. It’s important to use aluminum wire or something of a similar durability. From my own experience, steel wire is just too brittle and breaks after very little use. I would suspect that other metals such as copper, silver, and gold that you can sometimes find would prove to be too soft or two expensive in large enough quantities to be useful.
The easiest way to twist the wire quickly is to cut two lengths about 3 feet in length, something you can easily hold at either end while you manipulate it.
Here is an image of some of the double lengths of wire we have cut, as well as the coil it comes in. This is usually branded as sculpting wire when you look for it in stores.
To give you a sense of scale, here is one piece of the 16 gauge wire next to a standard toothpick.
So step one is to line the pieces of wire with each other.
Take one end of the two lengths of wire and insert it into the end of a power drill, tightening it down until the wire doesn’t slip or shift when you let go of it. When in doubt aim for too tight over too loose.
Take the other end of the wires and firmly grip them in a pair of pliers.
Once you have the wires tightly secured on either end, start up the drill at a slow speed. The wire will start to twist together.
Continue running the drill until the wire is twisted to the point you want. I usually like to keep it going until it looks roughly like the picture below. Some people prefer to twist the wire a little less than I do. You really have to experiment to find what works best for you.
There is some argument to be made for using a single strand of 8 gauge wire instead of the combination of two 16 gauge strands. The act of twisting them together does weaken them, though the combination is still stronger than the single strand by itself. The 8 gauge wire is stronger on it’s own, but I sometimes find it to be too stiff to be properly malleable for certain joints. Though part of the reason for my various test puppets is to actually find out if the 8 gauge would work better for certain sections of the puppet’s skeletal system. But that is something I plan to test out in my other two puppets besides Dewey.
Here are some of the pieces for Dewey and my second puppet Huey laid out beside their corresponding sections of cut wire. Dewey’s pieces are on the right using the twisted 16 gauge pieces.
When drilling the holes for the twisted 16 gauge sections of wire you need to make sure to drill the hole at least 1/4″ deep so that the wire can be securely glued in place. Use the 1/8″ drill bit to make a hole wide enough for the double 16 gauge wire sections. To combine the wood and wire elements, I use JB Weld. It’s a two part chemical mixture made of a liquid steel component (the black) and a hardening agent (the red).
Use a piece of scrap paper to mix the weld on. You’re likely not going to be able to remove the remnants of the JB Weld from whatever you mix it on. Try to combine equal parts of the steel and hardener and mix them together thoroughly. Again, since you’re not going to be able to get the weld off of whatever you put it on I would recommend mixing it with something you can throw away. I tend to use a use a toothpick because you can also use it for the next step.
Once you have your JB weld mixed together use the toothpick to fill the holes in the wooden pieces. I often also apply the weld to the ends of the wire pieces before slotting them into place.
Once the wire is slotted in, use your toothpick to smear the excess around the connection point, or outright remove it if you really have too much. You want to make sure that when it dries, that the wood and wire can’t separate because of too little weld.
It takes about 24 hours for the JB weld to set completely. Though after about 12 hours, you can move the pieces around gently if you have too. If you’re careful you can start gluing the next set of pieces together after the 12 hour point. If you’re gluing multiple sets in succession and aren’t starting the glues at the same time, I would recommend writing down the time that you set the last piece in each group so you can keep track. Again, make sure you have paper under your pieces. The weld can drip while it’s setting and you’ll want to protect whatever surface you’re working on.
I have a tendency to make a mess of my hands when gluing and normal soap and water doesn’t always cut it for getting the weld off. I find that gojo soap it pretty good at helping get some of the gunk off. Though at times you have to scrub well, particularly if you’ve been using plumber’s epoxy as well. this is what the bottles look like. It has some pumice in it which helps rub the grit off, though I’d recommend the kind that comes with its own pump. When the soap is exposed to the air over time it starts to change color and solidify.
Dewey’s fashionable footwear. You can make the feet completely solid if you want, but leaving a break between the toe and the heel can allow for a more realistic step and walk cycle.
The next few sets of glues are done in parts. I usually try to plan out how I glue the segments together so that I can be as efficient as possible since it takes a 24 hours for each set of glued pieces to completely dry.
After a few days, I’ve got most of the parts glued together. In the picture below you can also see the beginnings of the hand pieces. I took flat shavings of wood and scored them with 4 lines for the fingers along the wider surface and scored one of the side on each for the wire that would make up the thumb. I then took some 20 gauge wire and cut very long lengths of it and glued them into the lines. Due to the delicacy of the hands and the wire fingers, I found that I had to glue each of the fingers down separately.
Once the base of the fingers were set, I doubled the wire back into the individual finger shapes. Once that was done, I slathered the front and back of the hand with JB weld to secure the fingers. My hope is that I can cover the wire fingers with a thin coating of cloth that I can manipulate into some detailed gestures.
With the hands finished and the other sections all glued together, we now have a most completed Dewey puppet. The next steps after this are to build my other puppets and then perform some movement tests on them to see how the various versions of the armatures perform in use.
Ta-dah! A finished wood and wire puppet! 
A good reference book for creating this kind of wood and wire puppet is Stop Motion: Craft Skills for Model Animation by Susannah Shaw. It also has a lot of good information on building more complex puppets as well as the use of certain molds and plastics. Very interesting and informative for anyone who is starting out as a stop motion animator who uses these kinds of characters. Her webpage can be found here at http://susannahshaw.com/.
Some other good references that I have personally read on stop motion are:
Basics of Animation 4: Stop Motion by Barry Purves, his site is here: http://barrypurves.com/BA-StopMotion
Creating 3D Animation: The Aardman Book of Filmmaking by Peter Lord and Brian Sibley. Unfortunately this book is now out of print. I was able to find a used copy on Amazon, or you can always try their new book Cracking Animation: The Aardman Book of 3D Animation. I haven’t read it myself, but I would have to think it’s just as good, if not better than the first one. I know it’s certainly on my long list of books to eventually get around to reading.
More puppet building posts to come. Hope this might be helpful to some in the future. Once I complete my various movement tests and analyze them, I’ll be sure to add the links to those posts below here. Enjoy!


I want to make a short stop motion and was thinking about making wood and wire armatures, this post was really helpful. Thanks 🙂
Awesome! I’m glad it was helpful. The one thing I will share having finished my piece is that if you’re going to do anything longer than 30 seconds or with a lot of vigorous motion that extends the joints a lot it might be worth investing in a metal armature despite the upfront costs.
The wood and wire works well for short pieces but with my longer film I ended up spending a lot of time repairing overtaxed wire joints that cut into my timeline.
If you’re just looking to make some early test pieces to get yourself started out though, wood and wire is a great starting point. Good luck!
Thanks! 😀